To help you become quickly familiar with our site, we have listed the most frequently asked questions by users with easy to understand answers. If you do not find the information you need in these replies, do not hesitate to email us Click here to send us an e-mail or call us at 1-800-668-3826 for immediate assistance.
You need to enter a promotional code in the shopping cart to obtain certain discount. When a promotional code is entered in the shopping cart, your price will be recalculated.
Unless mentioned otherwise, promotional codes cannot be combined with any other promotion or discount offers. If a promotion code is inserted, while a promotion is offered, the pricing algorithm will calculate and reflect the best price value offer.
For security reasons, we have decided not to import your password information in your new Black.ca Online printing environment. You will need to validate your e-mail information and provide us with your shipping address.
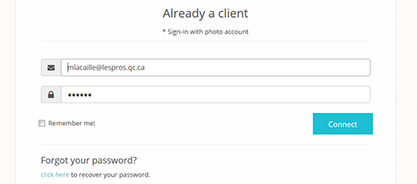
If you’ve forgotten your account password you can reset it with the following procedure:
-
1. Click on “Log In” in the top right menu.
-
2. Click the “Forgot Password” link below the log-in form.
-
3. Enter your email address.
-
4. Check your email inbox for information on how to access your account and reset your password.
Please note: It is important to keep your email address up to date. We use the email address stored in your account preferences to contact you with your password.
Please follow the steps below to sign up for an account:
-
Click the “Sign Up” link in the top right corner of any page.
-
Enter your first name, last name, email, password, and confirm your new password in the fields provided.
-
Click the box to indicate that you accept the terms and conditions.
-
Indicate if you would like to sign up to receive emails.
-
Click the “Sign Up” button.
You are now ready to begin uploading your images, creating photo gifts or sharing with friends and family.
If at any time you would like to make changes to your account settings, log in to your account and click the “My Account” link at the top right corner of most pages.
It is important to keep your email address up to date because it is your login username. We also send notifications to this email address when you order items.
Click the “My Account” link in the top right corner of most pages.
Locate the section called “Change your Address”. Enter your new address in the entry field provided.
Click the “Submit” button
Click the “My Account” link in the top right corner of most pages.
Locate the section called “Change your Password”. Enter your new password in both of the entry fields provided.
Click the “Submit” button.
Photo Uploading Technical Support
Our site is working to make your photo experience consistent across all browsers. Our upload and image management environment is HTML5 based and designed for all recent Windows and Mac platforms including Linux. Smartphones and Tablets on IOS and Android can upload and print straight from their browser environment.
The only requirement is using an HTML5 compatible web browser such as Mozilla Firefox, Safari, Internet Explorer 10+ and Google Chrome. While it is possible to use other browsers on our site, using a supported browser will ensure you have access to most of the products and services available.
NOTE: For security reasons, we do not offer image or album storage on the new Blacks.ca website. However, we will provide a safe temporary project storage environment to support your creative process for photobooks, calendars, greeting cards, and keepsakes.
Our HTML service allows the download of JPG or JPEG files.
- BMP, PNG, TIF, TIFF, HEIC and HEIF formats are also permitted, but it is best to use JPG and JPEG formats.
- GIF files are not accepted because the print quality would be insufficient.
Image file names must not exceed 150 characters.
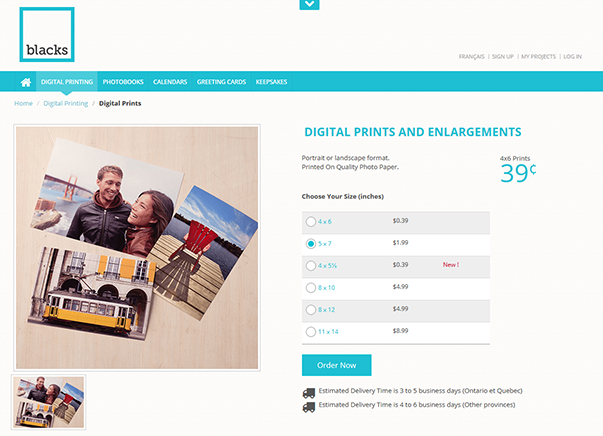
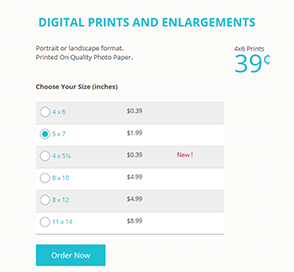
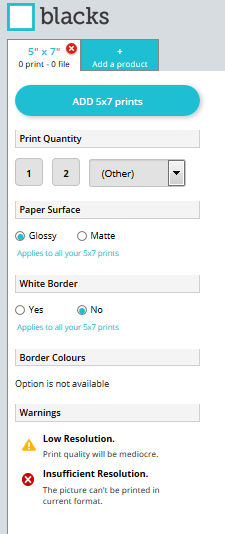
We do offer numerous print sizes. The most popular ones are the traditional 4''x6'' and 5''x7'' sizes. Check on our price list to find out our current online product portfolio.
Each product will have different specifications depending on the optimal print resolution required. Our system will automatically assess the resolution of your picture and compare it to the nominal resolution required to produce a quality print at the desired size. Our application tags pictures with insufficient resolution with an (!) or (X). In our app, an (!) indicates that you may still print a picture, but it will likely be of poor quality. An X means that the resolution is too low and not adequate for the requested print size.
Our program analyses the image. It then reviews and indicates if adjustments are required to optimize your image according to the selected print size or the selected product characteristics.
Note: If you want to know the required size of the image in advance, you may use an image editing software tool. Many editing tools are available on the web. They will tell you the correct ratio of a picture for a given size.
The time required to upload a picture depends on many factors such as the speed of your Internet connection, the traffic on your Internet connection and the size of the file. All these factors will bear influence on the upload process time.
Firewalls
If you are on a Corporate Network or are behind a corporate firewall, then you may be restricted by your corporation from using applications. Your Network Administrator can control configuration changes to the corporate firewall. If the HTML 5 Uploader fails to connect and upload images in this environment, ask your Network Administrator for help.
There is no established limit as to the number of prints in a single order. Bear in mind that the upload process time will increase based on the number of images submitted. We receive a good number of orders for more than 500 images to be printed. What's more, you can order as many as 9999 prints of the same image without any impact on the upload time.
HOW TO
No. We do provide the required infrastructure online. Our HTML5 uploader provides a universal uploading environment. Its sole purpose is to let you choose pictures and upload them to our production servers.
No! You may use images from various media and sources. The images need to be saved in the JPEG format. If you have a scanner, you may scan your pictures and save them on your computer. and then order copies or enlargements on our website. You can also print images from other sources such as Facebook, Google Photo, Instagram, OneDrive, Dropbox and box.
Editing My Pictures
Our editing features differ according to the product you are creating.
1. Editing features for Digital Prints, Enlargements
-
You can zoom, crop or rotate your images (portrait or landscape)
-
You can add a white border
Note
-
For red-eye removal there are many free editing tools available on the internet.
-
For special effects, you can use free online specialized products such as PicMonkey, Aviary, Snapchat, and others to create Black & White prints, add borders, frame, and many more features.
change to Photobooks, Wall Art, Photo Gifts & Calendars
-
You can Zoom, Crop or rotate your images (portrait or landscape)
-
You can add effects like B&W, Sepia and more.
-
You can use this environment to add backgrounds, frames, text, scrapbooking elements
For photo prints your image will appear with a red box showing the print area associated with the print size/aspect ratio. You can adjust this by clicking on the editing tool and zooming in and or moving the image left right, up or down.
Our print service will place your image onto the selected print size frame
-
If the image size ratio is the same as the print frame ratio, the image will fit perfectly.
-
If the image size ratio is different, we will center the image on the print frame. You can then adjust the cropped image to your satisfaction.
-
Black or White fill-in bars may appear in some instances.
Note
-
Our automatic cropping tool environment will work only if the resolution of an image is sufficient.
-
If an image resolution is not optimal, the application will not let you make changes.
With each order, we will provide you with an estimated delivery date.
Ordering Prints
- Select Print Features (type of paper, margins …)
- Quantity of Prints Requested
- Crop/Edit/Remove images from the print worktable
HTML5 version (non-mobile)

- A window will open and you will be asked to select pictures either from 'My computer' or 'Social Network'
- Upon choosing 'My Computer', windows will pop-up'.
- Select your images; they will be transferred to our servers (See note concerning 'Your files on our servers').
- Press ‘OK’ after the images are transferred. Click the OK in the Transfer completed window.
- The Print Options appear on the menu at the left of the worktable. Our print default options are the most popular print options selected by Canadian consumers.
- To edit the images, you need to move to the right of the worktable, where all the images thumbnails are exposed. A short menu appears when putting the cursor over an image. The options are:
- Enable limited editing
- Rotates the image
- Remove the image
Picture Editing
Note * Our print worktable methodology automatically 'center crop' an original image to the selected print size. If you wish to have an exact print size of your original image you should edit the image on the worktable. If the original image ratio is different than the print image ratio, part of the printed image may be cropped. For example, if you're printing a square original image, like an Instagram, to a regular 4x6 print format, the original square image will be centered. Because this image ratio is (1:1) the center crop will mask part of the original. You can edit this “center crop”. Just zoom in or out and rearrange the placement of the image.
Other features of the print toolset
To Add new print/product format to the print worktable
press the Add a product tab located beside the initial product tab of the worktable windowTo Add images to the print worktable
press the Add (photo format) button located on the left corner of the worktable window.Print Quantity
The print copy Quantity section enables you to select the number of copies for all the images thumbnails in the worktable. You can order up to 100 copies using the drop-down list. Note: You can also order multiple copies of one image by entering the quantity in the field below the image in the worktable. It is possible to order a maximum of 999 copies of an image. You need to enter the quantity in the field below the image.Paper Surface
Select the desired photo paper surface, the default surface is glossy.White Border
Create or remove border surrounding the prints. Applies to all the images in the worktable. The default position is “no border”Fill-in Colour
In some cases, editing the original image may create a white or black margin on the print. The margins can be white or Black. The default is usually white.Legend
Estimate the quality of the printed image based on the original image information. Icons are displayed to indicate printability of an image.Display size
You can increase or decrease the worktable thumbnail image display size by clicking on the + (plus) or – (minus) left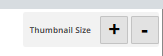
Ordering Photobook
Tip: As you get ready, gather your project images in one folder if you can, it will make the image upload easier. Don’t worry if you have forgotten some images, you can upload more later
Quick steps (6 steps to order a photobook)
- 1. Select your photobook type, style, and format.
- 2. You will be required to sign-in. If you don't have a project photobook open, click on the button that says 'Start a new book'.
- 3. Choose a photobook template.
- 4. Upload your images. Then arrange your images on the photobook worktable. Click on continue.
- 5. Preview your project.
- Go through each page, noting changes you would like to do.
- You can also do some simple editing at this stage, or click on “customize” to unleash our software full editing suite potential. (Edit images, add pages, change the background, add text, modify layout… and more)
- 6. When you are satisfied, save and order
- And remember: Our photobooks are printed in Canada. The quality of our books is guaranteed.
Ordering a keepsake products
(Quick Steps to order a Keepsake (Example mug 11 oz.)
- 1. On the web page, select the product category located under the Keepsake tab, then select the desired product within the category i.e. a Drinkware/ Mug 11 oz
- 2. You will be required to sign-in. If you don't have a specific mug project open, click on the button that says 'Start a new project
- 3. Name your project
- 4. Choose a Mug style or template.
- 5. Upload your pictures. Then arrange them on the workspace. Click on Continue
- 6. Preview your project.
- Review the workspace display, noting changes that you would like to do.
- You can also do some simple editing at this stage, or click on “Customize” to unleash our software's full editing suite potential. (Edit images, add pages, change the background, add text, modify layout… and more)
- 7. When you are satisfied, click save and order
- And remember: Our Photo Gift products are made in Canada. Our Keepsakes quality is guaranteed.
My saved projects
Two types of projects are available in your project manager.
- A project that has been ordered is stored on our servers for a period of 3 years. After 36 months of inaction, it will be permanently deleted.
- A project that has never been ordered is stored on our servers for a period of 1 year. After 12 months of inaction, it will be permanently deleted.
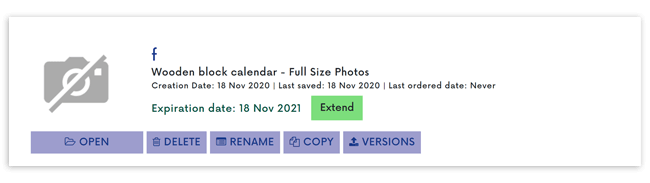
The expiry date of your photo projects - ordered and never ordered - can be extended for a period of 6 months.
Please note that products from the ‘DIGITAL PRINTING’ family are stored on our servers for a period of 14 days.
STEP 1
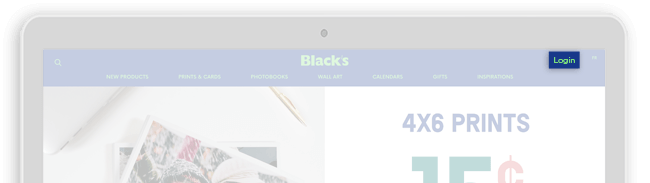
Go to the blacks.ca and log in to your photo account by clicking on "Login".

STEP 2
Once logged into your photo account, open the account drop-menu and click on "My Projects".
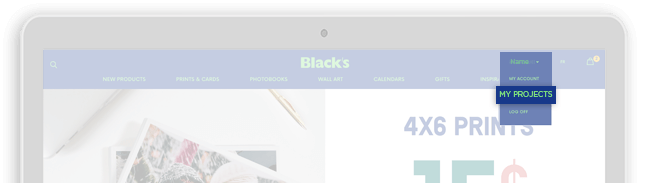
STEP 3
Once in the project manager, select "Nearing expiry project" on the left menu and choose the projects you want to keep by clicking on "Extend".
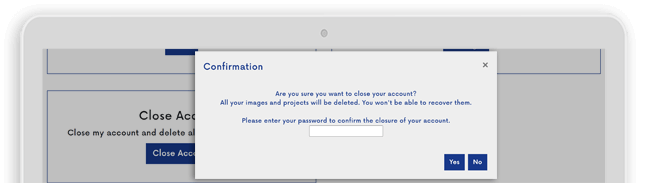
My photo account
STEP 1
Go to blacks.ca and log in to your photo account by clicking on "Login".
STEP 2
Once logged into your photo account, open the account drop-menu and click on "My Account".

STEP 3
Once in the account manager, click on "close account".

STEP 4
To confirm the closure of your account please enter your password in the dialog box that appears on your screen.